Titta gärna in på http://www.konstvark.se om du är kvinna med smärtproblem. Om du skapar (är kreativ) så kan du läsa om en trevlig grupp/gemenskap för just kreativa kvinnor med smärtproblem. Kanske finner du att deras facebookgrupp är något för dig – kontakta dem då via länken på konstvark.
Mvh
The Creative Lady
För kvinnor med smärtproblem
07 Aug 2013 Leave a comment
in Uncategorized Tags: Baka, Fibromyalgi, Kvinna, Måla, mixed media, Smärtproblem, Sticka, Virka
Carts with covers
11 Jun 2013 Leave a comment
in Organization Tags: budget crafting, carts, DIY, mixed media, organization
I love love love my carts, no doubt about that but they are not the prettiest to look at now that Ive filled them to the brim :D. So as a kitten will move in with us in about a week I decided it was time to do something. I don’t want the kitteh to play with all my tape and lace and paper so whats a girl to do.
Well she buys more wax cloth and has hubby sew covers (I don’t like sewing large things like that). They are easily made (yes I say that even after I enlisted help 😉 ) because its just a square with a tunnel (on the top and bottom) for the elastic band. Measure your cart, cut the wax cloth and sew the tunnel. Pull the elastic band through the tunnel, make a temporary knot, put the cover on the cart and pull the elastic band tight and tie a knot. Done.
If its a little bigger then you wanted or if you want the cover to overlap, just cut open the tunnel a little and the cloth will overlap – the great thing about wax cloth is that it wont fray. If your cart is very high you could add some velcro in the middle where it overlaps. Or you could just add velcro on both sides and not bother with sewing at all!
Carts with the covers


The back

Organizing with carts (for crafting in general and LifeBook)
10 Mar 2013 5 Comments
in LifeBook 2013, Organization Tags: altered art, carts, Lifebook, mixed media, organization, supplies
I think I’m like most artists, I keep stuff everywhere because I don’t have the luxury of having a studio. I’m a scrapper, a card maker, a mixed media artist, I’ve taken up painting with LifeBook 2013 and I also do miniatures in 1:12. So you can imagine the amount of stuff I have accumulated over the years 😉
I have paper in wardrobe under my coats, I have scrapbooking decorations under my desk in my bedroom, punches in boxes under my bed and my miniature making supplies in 1/3 of a room (the rest of the room is dear hubbys who builds model aeroplanes and other stuff).
But most of my stuff for LifeBook and painting I keep in two carts. I started out with one and it took 4 months to outgrow it and it spilled over untill we couldn’t use the kitchen table at dinner time. Of course we had to be able to eat at the table so I went out and bought another cart (I wonder how it will take to outgrow that one 😀 )
I thought about putting the carts against a more fancy background when taking the photos but I thought Id show you the real world. One stands next to our washer and the cats eating bowl, the other one stands next to the dining table. Not the prettiest of pictures but we all live in the real world and it’s not always fancy. They have wheels so they can be easily moved if we want to seat more people at the table.
The carts cost 99kr/st (ca $15/each) and the wax table-cloth cost 30kr (ca $4.3). They are 64cm high, 36cm wide, 26cm deep (outside measurements).
Enough about that. You want to see the carts. So here they are.
Cart no1

Shelf 1

The first cart contains almost all of my current paint. I prefer golden liquid or golden heavy body.
I have all the paint stuff, extender, flow improver, glossy medium on the first shelf. Behind the paint I keep my self mixed spray inks. I also keep my Neocolor II there and my Inktense and a set of oil crayons. (Although I almost always use my travel case with Neocolors, I will make a post about that later).
On the side there is a litre jug in which I keep the brushes that are oversize in length or width. It also contains my brayer, my markers, my metal ruler and an assortment of this and that. I keep my brushes in a small plastic bag to keep the cat hair of them. I only own nylon brushes, I think they are the best with acrylic paint but they also attract cat hair, at least in my household.
Shelf 2

On the second shelf I keep my mediums. All golden products. Gel matt medium, gel semi gloss medium, gesso (I have a big jar in storage and fill up the small jar when I need), glass bead medium, tar gel. I also keep my “rub ‘n buff” on that shelf and my inks. I also keep different types of glue there. Regular paper glue (stick) and my favorite – Aleene’s Tacky Glue- and Gac 500 in a small bottle which I fill when needed. I also have two types of masking fluid. One that is with a brush and one that is with a fine tip for the finer details on a painting.
I use the golden gel medium for most of my glueing and layering of paper and its by far my favorite matte medium. If I need it to be more like decoupage glue I just mix it with water. I havent used glass bead gel in LifeBook, yet but I’m sure I will find a project for it. I used the tar gel with glitter to create the wings to my Fairy Art Mother.
I keep a few make up sponges too, they are cheap and come in different textures and sizes. I love them for dabbing paint. If its possible I love to finger paint but some of the paint from golden contain pigments that aren’t supposed to be that healthy and that’s why I use sponges.
The flow improver is a product that you use very small amounts of so I keep a pre-mixed bottle with flow improver.
Shelf 3

On the bottom shelf I keep extra bottles and jars for when I mix paint. There’s my beloved heat gun (a definite must) and bees-wax (I have yet to use it but it’s there). I also keep wax paper there for the times when I need to protect the surface I’m working on.
There’s also sanding paper and plastic lids that are perfect for mixing paint on.
Cart no2


Shelf 1

On my other cart I keep paper pads on the first shelf and all of the things I use to make backgrounds right now. Lots of stamps and two black ink pads. I also have a variety of stuff that I can use to stamp with using paint or ink pads. There’s also my stencils/masks.
I have spray fixative and spray glue and my mannequin doll (still in the box, havent been able to that lesson yet)
Oh, I almost forgot my spirograph. It’s a kids toy but I love the shapes it makes.
Shelf 2

The second shelf contains different kinds of embellishments that I use in lots of ways. Lots of bingo items and flowers. Some decorative papers, playing cards, napkins and some fabric. I keep the really small embellishments in mini containers. ($1,5 or 10kr for 4)

Shelf 3

Last but not least I keep my mold making supplies on the bottom shelf. They are not for LifeBook but I use them for my 3D-paintings so I keep them there. I also have an apron made from half a trash bag because I tend to get paint everywhere, its part of the fun.
In a later post I will show you my travel kit that so far hasn’t traveled further than my living room table.
I think this is the longest blog post I’ve written and I’m amazed if you have made it this far. If you have questions please ask, I write for you 🙂
Lifebook 2013
26 Jan 2013 Leave a comment
in LifeBook 2013, Mixed Media Tags: art journaling, budget art journal, mixed media, Self expression, Tamara Laporte, willowing arts
So I decided to sign up for LifeBook 2013, a year-long online mixed media art class, run by Tamara Laporte. I wanted to learn new techniques and thought it was a great deal. The inner journey hocus pocus thingy I thought I’d just ignore. My oh my, what was I thinking! Did I suddenly lose my brain? Art is about self-expression, at least it is for me. I belive that it is impossible to create something without putting a part of yourself in it. So of course I am doing the inner journey hocus pocus thingy 😉 as well as learning new techniques.
I have to get my scanner up and running (I have a very temperamental HP multiprinter/scanner) before I can show you pics of my work. The camera lightens everything up and distorts the colors so that it doesn’t seem like my work anymore so I feel that I need the scanner for these mixed media paintings.
Christmas card / Thank you card
21 Dec 2012 Leave a comment
in Cards Tags: card, christmas card, DIY, mixed media, scrapbook inspirations
It’s the season to share the love you have for others but it’s also the season that seems to have the least hours per day. So I ended up making a very quick and easy card to attach to the flower arrangement I bought to give to my grandma ❤
It’s pre scored card, a christmas tree freebie from some magazine (probably Scrapbook Inspirations, it used to come with a lot of freebies and I’ve accumulated a few over the years) and Tim Holtz Distress Stickles glitter glue.
I drew glittery lines with the glue and added glitter glue to the ornaments on the tree. I attached the tree with foam pads for a little dimension.
On the inside I stamped Merry Christmas & Happy New Year and a personal greeting.
Took less than ten minutes to make including drying time using a heat gun.

Art Journal on a budget
05 Dec 2012 Leave a comment
in Budget crafting Tags: altered art, art journaling, budget art journal, budget crafting, cheap art journal, Crayola, free printables, mixed media, Self expression
Art journaling doesn’t have to be expensive. You don’t need bunch of fancy stuff and materials to express yourself.
If longevity (how fast something turns old/begins to turn yellow) is something you are not concerned with than there is absolutely no need to spend lots of money on supplies. A simple notebook (with or without lines) is all you need to get started (and often it takes many many years for them to even get a tint of yellow). Or you can buy a sketch pad, they are almost always acid free and longevity is not an issue. However if you plan to use water or watercolors you can not use a sketch pad – it will crumble.
A pencil, a pen, Crayola wax crayons, the ones kids use, and you are on your way to express yourself in an art journal. The cheapest crayons in my store happend to be Faber Castell

Wax crayons
If you want to take it one step further I suggest buying Crayola pencils (or any other brand that is cheap) and a Staedler Pigment Liner pen (size 1).
All in all it should be possible to get started for §10 or less.
If you want inspiration or free printables I have collected some sources at Pinterest
What is your best budget tips?
(wordpress wants you to add an email adress to comment but I promise that I never look at it, I will not use it, I will not spam you – so please comment with your tips/advice)
6/12: I tried the wax crayons I have and maybe the Crayola crayons are better, but if not I suggest crayola pencils as your first buy.
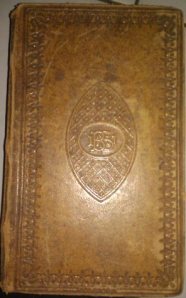
Amazing old book cover
01 Dec 2012 1 Comment
in Books, Mixed Media Tags: altered art, books, lettering, mixed media, old book
On my last visit to a thrift store I found a really old book. It’s the New Testament from ca 1875. The lettering is fantastic.

It makes me so sad that this book has not been cared for. It’s missing pages and it looks like it’s been stored in a barn, there are water stains and it’s missing quite a few pages. But it will find a new life in my mixed media projects.
I don’t know what I’m going to do with the cover but it has to be something extra special. I wish you could see the amazing book cover in person. The photo doesn’t do it justice.
Old books are the best
24 Nov 2012 1 Comment
in Books, Mixed Media Tags: altered art, arts, literature, mixed media
I bought some old books at a thrift store (Erikshjälpen) today.

The images are wonderful and the quality is amazing. They were printed in 1932 and although it’s never easy to cut a book up it almost breaks my heart to cut up such old books.
I try to think that Im giving the books new life and that I honor the artists that painted the images (you can almost see the structure in the pictures I took) by giving their work new life. Some of them are so beautiful that I will probably use them as backgrounds on cards, others will be used in my mixed media projects
There’s also a book about words and sayings. It will be saved as it is for now.
